so fresh and so clean

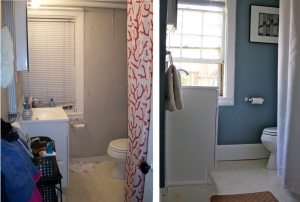
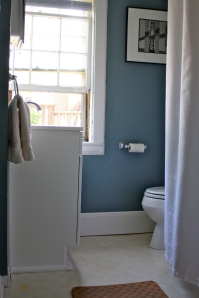
We were completely satisfied with how the bathroom turned out. The blue paint color, which was Oops Paint from Home Depot, worked out really well.

I love how it gives the room a cool, relaxing feel to it. Especially paired with the white trim and accents. Much better than those nasty, green vertical stripes.

Here’s the final cost breakdown:

1 quart of Oops Paint: $1 (Home Depot)

Light fixture above sink: $9 on sale (Home Depot)

Medicine cabinet: $9.99 (Home Depot)

Shower curtain: $9.99 (Home Goods)

Shower head: $9.99 (Home Goods)

Towel and toilet paper fixtures: $7.99 (Target)

Baskets on shelf: Owned

Cork bath mat: Owned

Bin on top of toilet: Owned

Art work: Owned

Total: $47.96 + some tax

Not bad for a complete bathroom update! We chose not to buy the best of the best since we rent and most of the things we can’t take with us when we move. The light fixture and medicine cabinet are nothing special, both are very basic. But they are mold free which makes me happy.

I have to admit, I had such a need for a clean bathroom to feel comfortable that I didn’t shop around too much for better deals of Craigslist steals. Sometimes I wish I did, but at the time I was just happy to have a clean bathroom. And we had originally budgeted $100 for the entire project so coming in at half that felt good.

Here’s one last before and after comparison:

We love knowing that it’s mold free, clean, fresh and comfortable!

how to remove wallpaper with a smile on your face

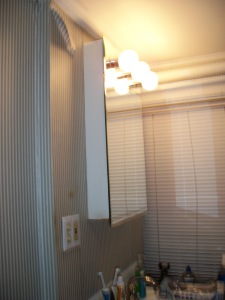
As you can see from these before pictures the wallpaper was really pretty in the bathroom. The first thing we did in the house, 4 days after we moved in was redo the bathroom. A dirty, gross bathroom makes me really uncomfortable. The medicine cabinet was covered in mold, the floors and walls were stained and dirt covered and the toilet seat was wooden. Enough said.

Gross.

My sister generously picked up a new toilet seat for us the day we moved in. I felt better instantly.

Next up, we had to tackle the wallpaper. We borrowed this champ of a steamer from my parents to assist in the process. It takes a while for the steamer to heat up, but allowing it the proper time made the removal that much easier. And that puppy got hot. The steam was so intense that the freckles on my face tripled. For real. We simply followed the instructions it came with and got to work. I was in awe at how easy the paper peeled off by using the steamer.

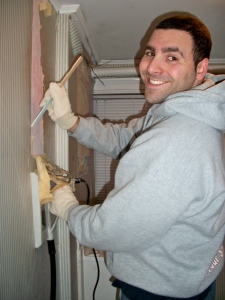
I was in charge of steaming the paper and Al followed me scraping and peeling it off (except for in this photo where he’s being awesome and doing both jobs) . We started this project at 11pm and realized we didn’t have a scraper. So we used a paint stick. How’s that for working with what ya have?

We had the entire bathroom de-wallpapered (is that a word?) in about 45 minutes. I thought it would take 2 days. My happiness, and lack of actually helping, is shown here:

This is how it looked sans wallpaper. Excuse that massive plunger smack in the middle of the picture.

I’d say it’s a whole lot better looking like that than it was with the wallpaper. It’s amazing how much bigger the room felt once the wallpaper was removed too. If you’re looking to remove wallpaper anytime soon I definitely recommend getting a steamer like the one we used. It simply made the whole project that much more tolerable and it was a huge time saver. Though, truthfully, I hope I never come in contact with wallpaper again. In my life. Ever. Who thought it was a good idea to glue paper to walls?

dual bedroom makeovers

As a Christmas gift to my parents this past holiday, Al and I decided to organize and give purpose to two bedrooms in their house. One was once mine and one was my sisters. Since we’ve both moved out, the two rooms have attempted to have purposes, but have both ended up being more of storage rooms with a bed that you can kind of see and a pathway to the computer desk. They were traveling the weekend before Christmas so it was the perfect time to get the rooms re-done right before the holidays.

We had decided that since we only had two days to complete the project we wouldn’t paint the walls, we had to just work with what was already there. Here are the before pictures.

Hayley’s room before:

My room before:

SO, we had some work to do and truthfully, most of the work was just finding a place for everything. Hayley’s room was still decorated from when she was living there and half of her belongings were still there too. We went through and categorized her things as toss, donate and sell (with her permission, of course). Once we did that her room was a lot easier to work with. We cleared everything out and had a clean slate. We turned her room into a true guest bedroom (not just a room with a bed!).

This was the outcome:

A neat, orderly place for guests to stay. There are also a few storage cubes in the closet, as well as board game and clothing storage.

As for my room, the biggest problem was that there were crafting and scrapbooking supplies everywhere. They just needed a home that was easily accessible. Well, there were other problems too but we got them all figured out! This room needed to serve a bunch of purposes: office area, craft storage, golf storage, workout room and sitting room (Dad sometimes likes to watch TV in here when he’s not in a Dancing with the Stars kinda mood). Here’s how we made it happen:

I’d say we did a halfway decent job of allowing this room to have numerous purposes. In the closet (which I forgot to take a photo of and am very annoyed at myself) lives the craft storage and golf storage. It’s very organized and easy to access. You can also see the treadmill in the corner of the first photo. It fits well in the room and isn’t smack in the middle.

Here are the cost breakdowns of each room:

Guest bedroom:

Day bed frame and trundle (we already had the mattresses): $100 (Craigslist)

Pillow cases and 2 toss pillows: $13.99 (outlet store)

Closet curtain: $4.99 (thrift store)

Wall hangings: $9.99 (some from thrift store, some from craft store)

Guest towels: $12.99 (Kohl’s)

Everything else: FREE. It was either already in the room or in my parents’ house somewhere.

Total: $141.96

Office/workout/sitting room:

Closet curtains: $7.98 (thrift store)

Calendar: $6.00 (office store)

Coat rack: $9.99 (Christmas Tree Shop)

Everything else: FREE

Total: $23.97

For a grand total of $165.93. So we we’re able to convert both rooms for under $200 which was my original goal. Al and I were totally pleased with the outcomes and so were my Mom and Dad. There were some things we would have done differently, if we had more time or money, but for what we were working with we love it.

Do you have any tips/advice? Any things you would have done differently if you were us? Definitely share, we’re always looking for new ideas!
19 hour room redo extravaganzaaaa

That’s right, 19 hours folks. 9 am I arrive at Emily’s apartment with paint, brushes, a power sander, and coffee in tow; everything we needed for the big room redo. Emily’s room that is. It needed some TLC; mismatched furniture, out of place items, 12 million pens (seriously, in her room we found about 200 pens?!). We made a quick trip out to pick up a few things and…3 hours later, we got to work. Or so we thought. The cord to the power sander didn’t reach any outlet, Em was intimidated by the primer and we were totally disturbing a pool party taking place behind us.

Well then she got mad, she may have started to swear, I can’t remember because I was afraid of her. But she was angry. Angry that we had a perfectly good power sander and we were doing this by hand. She booked it to the hardware store, determined and not about to give up. 30 minutes later we have a death trap of extension cords spanning about 4 flights of stairs, a working power sander and a happy Emily.

12 hours later we’re still working in the pitch black trying to finish this furniture. It was around 1 am when all the furniture was finally done…except for the drawer that my crooked eye drilled. We think we’re done, until we get this second wind and start busting through the massive amounts of things she has stored in places of her room that you and I didn’t even know existed. By the time 4 am rolls around we were spent.

It was totally worth it, the best way to do a quick makeover is to get it done in one day. It was a successful, budget friendly makeover using all the furniture she already had and adding a few new touches. Her room is much more inviting and cozy and she’s loving it. However, I don’t think she’s signing up for another marathon room makeover any time soon!

Before:

During:

After!

What we did: sanded, primed and painted the nightstand, dresser and bench at the end of the bed. Decoupaged the bookshelf with wrapping paper and tissue paper, added curtains and an area rug, photos and art on the walls, cleaned and threw things away…no need for clutter, prettied up the bed and added a few accesories. And the whole thing, for under $200!