diy hopscotch mat

I made this hopscotch mat as a Christmas gift for the girls I was nannying for before we moved to CO. And when I say for Christmas I mean that I just mailed it to them a week ago. It’s the thought that counts, right?

The end result was super cute but I ran into a lot of sewing issues during the process which is why it took me so long to get it to them. I have to un-sew it like at least 5 times. But let’s start from the beginning.

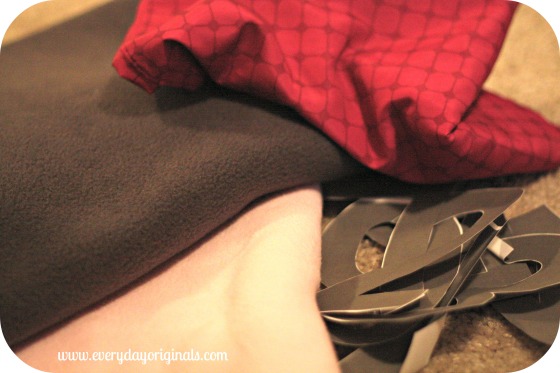
supplies

First, I bought two colors of fleece (with a coupon!) from Joann fabrics. I cut out the size of the mat and the size of each hopscotch square. For numbers 1 & 4 I cut the same sized squares. For 2/3 & 5/6 I cut out the same sized rectangles. And then for number 7 I cut out half of an oval.

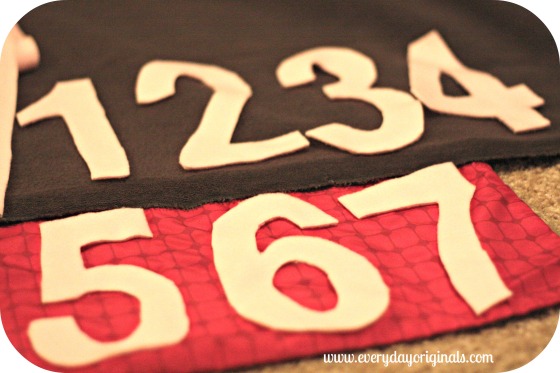
After I had my pieces cut out I then printer on the computer the numbers 1 through 7. I made them large enough to fit each grey shape I had cut out. I apologize that I don’t have any exact dimensions or the exact font size. You know me, I’m not good at tracking those details. I need to get better at it. Anyway, I printed the numbers and then cut each out. I pined each number to the light pink fleece and cut them out again. So then I had all seven numbers cut out in the pink fleece.

fleece numbers

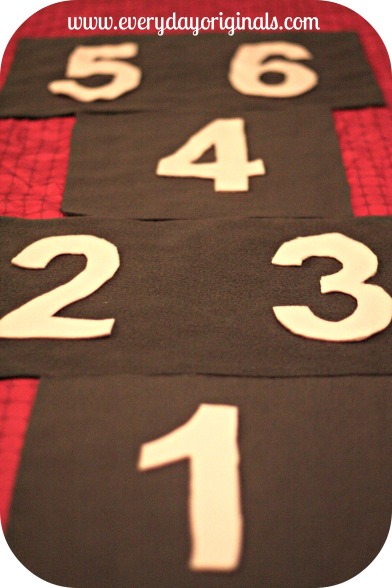
I pinned each number to its respective grey piece of fleece and I very carefully and slowly sewed each one on. Surprisingly this step was the easiest of this whole project. It took me a little while but as long as I was taking my time and watching what I was doing it was quite easy to sew the numbers on.

Once I had all the numbers sewed on I positioned each grey piece onto the pink and pinned them. This is where the horror started. The fleece kept stretching every time I tried to sew the pieces together. So no joke at least 5 times I tried sewing it and then I would un-sew it every time. So after weeks and months of getting so frustrated I was ready to give up. But then obviously superman Al swept in and was all encouraging and was all maybe there’s a different way you can make it.

squares

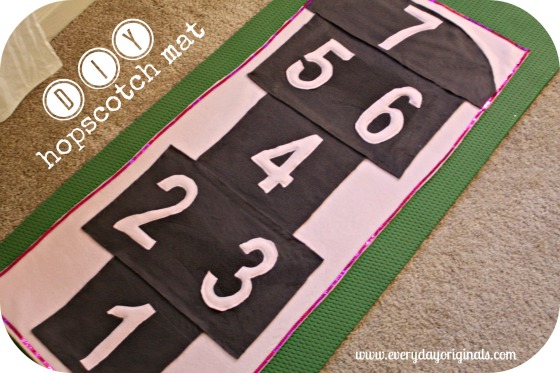
So I resorted to the iron on tape. I positioned all the pieces the same way and I used the heat bond tape to secure them all. It worked fine, but I had all these cute visions of a zigzag stitch outlining each hopscotch piece. After all was ironed together (I simply followed the instructions on the heat bond package) I let it settle for about a day. Then I picked up some sequin ribbon in the dollar section at Target. I hot glued that around the entire perimeter of the mat.

hopscotch

Once it was complete I thought it looked really cute. I rolled it up, wrapped it with a bow and mailed it off to the girls. I only hope that it stays together. Darn fleece on fleece sewing!

Have you guys been sewing up anything cute lately? Having a better experience than I am?!

October Pinterest Project: Carabineer Hair Tie Organization

My Pinterest Project for this month is so simple, yet so practical. If you’re not following me on Pinterest yet, head on over there. The more I “Pin” things the more I love it. Social media fascinates me! Check out my other Pinterest Projects too.

Hair elastics are one of those things that are used everyday, I find them all over the house, but when I need one I can never find one.  Simple solution: a carabineer!

I usually leave them on the packaging that they come on but they’re still so annoying to pull off of that. This solution was so easy; I can see all the different styles and easily unclip them as I need.

I use three different types of elastics – regular ones, ones with rubber on them for exercising (they don’t slide out of your hair, I ran the whole marathon and didn’t have one issue with hair ties), and ones that look like a bracelet, because I ALWAYS have one on my wrist! And strangely enough I’m totally brand loyal to Goody elastics (they know nothing about me or this post, I just like them a lot!) only. Am I a hair tie snob?!

What about you guys – do you have a certain way to organize hair ties? Carabineers anyone?!

september pinterest project {3 days late!}: travel toothbrush case

This was a project I’ve been meaning to do for a while and I just hadn’t gotten around to it. Which is funny because it took all of probably 10 minutes. My sewing machine is packed up so my mom helped by sewing it for me. Which was probably for the best because if I had sewn it, it probably would have been an hour-long project. Are you on Pinterest? Head on over and follow me!

And as per usual there are no before or during photos. I’m trying so hard to get better at that! These photos are pretty bad. I was at my parents’ house and forgot my camera. These are photos from my cell which are terrible. I just got a new phone and the camera is worse than my old phone!

You start with your supplies: 1 wash cloth and ribbon. I picked up the wash cloths for $2.99 and my mom had ribbon remnants so I used what she had. I laid out each item I’d be rolling – toothpaste, toothbrush, floss tool, extra flossers. Then I folded up the bottom of the wash cloth to make a pocket and pinned lines depending on how wide each slot needed to be.

My mom sewed the lines so that I then had a little pocket for each item. To finish it off she sewed the ribbon on one end. I made one for me and one for Al. If we used regular toothbrushes it would all fit in one, but since we use electric they’re much bulkier so I made us each one.

Then you just roll it up and tie together. The best part? No slime from tossing your toothbrush in a Ziploc bag when traveling and its completely machine washable! I wash them in one of those mesh bags so that the ribbons don’t get all caught up in the washer.

Have you been working on any Pinterest project’s lately??

august pinterest project: bachelorette party survival kit

Last weekend was my sisters bachelorette party and it was a great time! There were 10 girls total and I wanted to make some sort of cute kit with a few essential things. I searched around on Pinterest and found a few different ideas and then added my own touches.

I was planning to bring these plastic wine glasses so I thought I’d make the little kits in the wine glasses. I gathered my supplies and put them together.

After I fit everything in the glass I placed a clear bag over them and tied a bow at the bottom.

The water bottles didn’t fit in the glass so I just set it on the side when I displayed them. This was the setup in the hotel we put together. The empty baskets were for chips and salsa.

I also included a sign to include what each item in the kit was for.

They turned out really cute and were fun to have to kick off the weekend right. We had a great time, traveled by limo and spent a night at the casino. I ended up winning a nice chunk of change… not bad for my first time at blackjack!

june (oops) pinterest project: diy dessert stands

As I was getting ready to write my delayed July Pinterest Project post I referred back to all the others and realized I had never done June. So let’s make this one June’s Pinterest Project and then I’ll get my act together to do a July one too that will be posted in August also. Following?

These are adorable and SO easy to make. I gathered a few different glasses: a martini one, margarita one and an old champagne glass and some glass plates that I had already. I was making these for my sisters bridal shower so I painted them in the color scheme.

There were only a few supplies needed and like I said it was so easy. I followed these instructions. I altered mine a tad since I used glass plates, I didn’t paint on the top of the plate, but I did still use a doilie when serving food.

I’m sad to say that this was the best photo I had of them, which was actually a photo of the cake and I just cropped in on the dessert stands. I didn’t want to photograph the after until it was cute with the doilies and the desserts but in the end I completely forgot to photograph them. Fail!

They were cute and inexpensive to make and it added a little jazz instead of just using all dessert platters. Have you guys been up to any Pinterest projects lately!?

may pinterest project: diy pelmet boxes

I’ve been wanting to make some pelmet boxes for a while now and I’ve had the supplies ready to go. Well, over the weekend I finally got around to it. They’re so easy to make and very inexpensive too. I’ve been looking at different styles on Pinterest and finally decided to do the easiest one possible.

I used a cardboard box (instead of foam board), a stapler, a staple gun and burlap for mine. I also used a rotary cutter (or scissors are fine), and a yard stick. I had everything except the burlap which I purchased 3 yards of at Joann Fabrics, with a coupon, for less than $6.

Quite simply I just made it up as I went. But, I also read a few of the different tutorials too. It was as simple as measuring the window, marking the box and cutting it. I added about three extra inches to each side and scored a line, so that the cardboard would fold easily and be able to secure to the window frame.

I cut my burlap about two inches larger on all sides of my cardboard so I could wrap it like a present.

And that’s just what I did. I wrapped it and using a normal desk stapler I stapled it all around. I stapled it like the way you’d staple something onto a cork board, by opening up the stapler, not the way you’d staple two pieces of paper together. Get it?

After that I used the hot glue gun to touch up any spots that were being rowdy; mostly on the corners.

Then, where I had scored the ends, I bent it gently to get it to square off so I’d be able to secure it to the window trim.

I called in the muscles to staple it to the window. Al got to work, reminding me about how he hates that burlap sheds. But in the end we were both pleasantly surprised.

I had this feeling that this cardboard box window treatment was going to look like, well, a cardboard box. But it didn’t! I hate drapes with a deep passion so I think this is a great alternative. And for two windows it was less than $6. Can’t beat that.

How do you guys dress your windows? Do you love drapes? Or maybe you just use shades or blinds? A side note on the photos…there is SO little natural light in our house. For the past 15 months I’ve taken more photos trying to figure out the best way to take photos in this house and I’ve reached a point where I’m almost giving up. So I apologize that the photos are dark!

april pinterest project: t-shirt shag rug

I’m loving doing my Pinterest projects! This month I made a t-shirt rug using old white t-shirts of Al’s. For awhile I’ve been wanting a small roundish rug at the top of the stairs between each bedroom. It’s a tiny landing and I thought it would look better with a little rug and it would be nice and cozy on cold toes just waking up.

I started with a large pile of t-shirts, collected over a while. Every time one would be worn out and grungy I’d take it from Al and put it in my pile. I wanted all white but you could do all different colors (like in the tutorial I followed). I followed this tutorial that I had pinned on Pinterest.

I started by cutting one t-shirt in half and then cutting out an oval shape for the base of my rug.

Then I cut two entire t-shirts worth of 6 inch long, 1 inch wide strips.

I then made vertical and horizontal snip-its in the oval shape. I alternated doing one row horizontal, one vertical and so on. When I was done I had a big oval with lots of holes.

I started to thread the strips through the holes. I’d pull it through the hole and then loop it around back and pull the other end of the strip through another hole close by. Then I’d start with another strip and thread it through one of the same holes that there’s already a strip in and loop it through to another empty hole. Is this making sense? The tutorial probably explains it better!

And then I get really excited and on a roll and forget to take photos of anything during the process. Check here for photos during the process.

I did this for a long while, easy but time-consuming and a bit tedious. I sat and watched the Bruins game while I did it. Definitely a mindless, in front of the TV project.

Once all the holes were filled I went through and made a few extra, random snip it’s where there were open spaces. I threaded more strips through until it looked fuller.

I was really pleased with the outcome! It’s just a tiny rug, I’m not sure I would have had patience for much more than that, but it’s the perfect size, texture and dimensions that the top of the stairs needed.

For cleaning purposes I figure since it’s not a high traffic shoe area, I’ll probably shake it outside gently pretty often. When washing is needed I’ll put it in a mesh bag to wash so that all the pieces stay together.

What about you guys? Have you been working on any Pinterest projects lately? I’ve been working on them a lot more now because I’m just loving the inspiration and ideas!

march pinterest project: hemming your own pants

I made it, just in the nick of time with my March Pinterest project. There’s no reason why I didn’t do this sooner, I’ve known since March 1 that this was going to be my project and my pants have been piled up since then too.

I decided to attack hemming my own pants. I mean at 5 feet tall it’s no surprise that pretty much all of my pants since I was like 14 have needed hemming. My mom used to hem them for me, she’s a pro with the sewing machine. I’ve also had seamstresses hem them at $10-15 a pop.

I figured why not give it a shot. I found this tutorial through Pinterest and followed it exactly. Except for that they make it seem really easy and when you’re sewing machine challenged like myself, it wasn’t that easy.

I have three pairs of pants that need hemming. As of writing this post I’ve completed one hem, on one pant leg, on one pair. Not bad! I mean yes, I thought I would have been further along, but I’ve got time. Why rush? My attention to detail is pretty extreme so I’m probably the slowest sewer in the world. The faster I push that pedal the more out of control things get.

I started by trying on the pants with the pair of shoes I’d most likely be wearing them with (heels, flats, etc.). I pinned them up and got to sewing. It was incredibly easy to follow along the line of the original hem. I actually thought it was going to be tougher and that I’d keep bumping into the hem, but it instead worked more as a guide.

After I completed the whole circle I folded them back down, inspected it and celebrated. They were straight, with no mess ups and actually still looked like jeans!

I’ve yet to pull the iron out, I’ll do that when I’m done with them all. I threw on a pair of shoes, which these are clearly heels jeans, but the flats were the closest thing to me. No need to exert too much energy looking for the right shoes.

Not too bad! Have you guys hemmed your own jeans? Oh, what’s that? You’re strikingly perfect at 5′ 7″? Well, I’d kick your butt doing the limbo. Okay I’m done now. Have a great weekend!