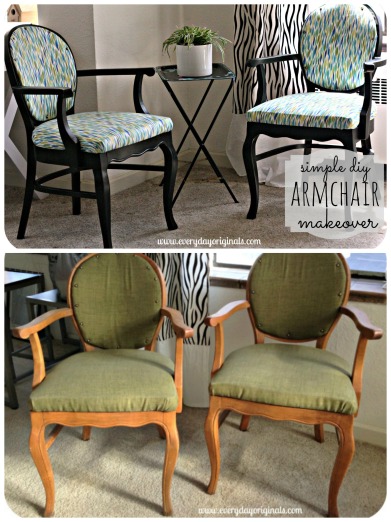
armchair makeover: done!

Wow. Just this week I had a moment of wondering if I ever posted the rest of this chair makeover. And then I realized I didn’t. So, here goes. What we had left to do was just paint and re-assemble the chair, really the easiest two steps.

IMG_4531

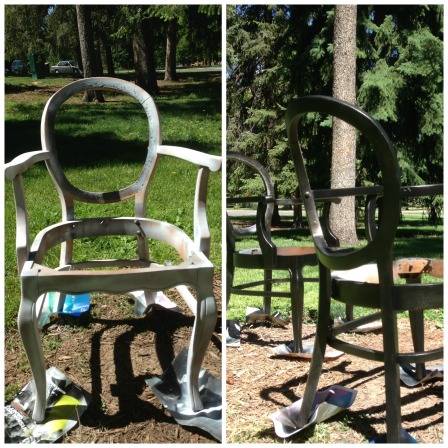
We decided to go dark with the chairs since the walls and carpet are neutral in our place. I love crisp white things but they would get lost with all the other neutrals. We used Krylon spray primer and oil rubbed bronze for the color. A quick, light coat of primer did the trick and then we Al got to spraying them. Each chair took two coats of paint to get full coverage.

PicMonkey Collage

They covered really well and dried nice and evenly. We painted them at one of the locals parks so while they dried I tortured Al with making him do a cross fit workout with me that I lead. Poor guy.

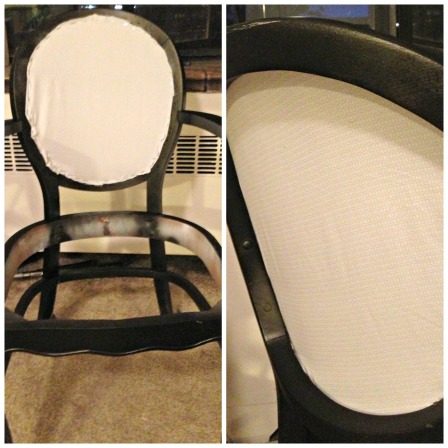
Once we got them home we started to re-assemble. First, using scrap fabric that I had I covered the back hole of each chair. I just cut the fabric to the size and used my staple gun to secure. The seat bottom was easy to re-attach, just needed to set it on the chair and drill the screws in. The top front piece was a two-man job.

PicMonkey Collage1

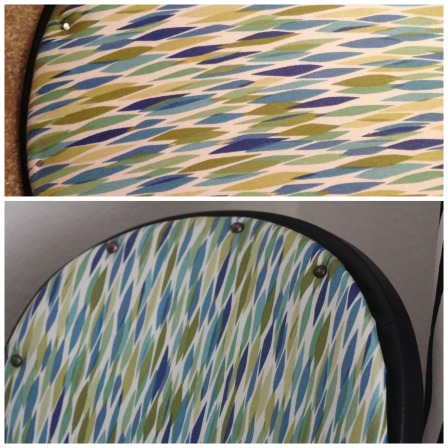
One of us would have to hold it perfectly in place while the other hammered. For this we just hammered nails right through the cushion to attach to the wood. We evenly spaced the nails and then re-used the original tacks that were on it to cover each nail. It actually worked out perfectly and saved me some money because I had originally planned to buy new upholstery tacks.

PicMonkey Collage3

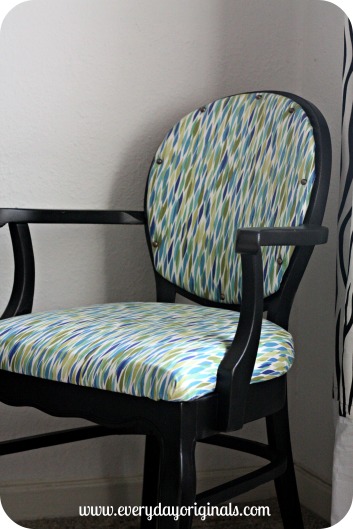
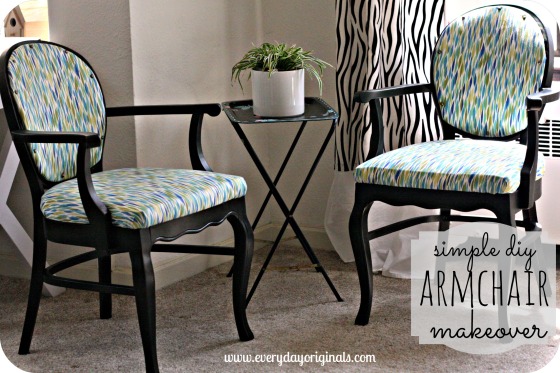
That was it! Our two free chairs got an inexpensive makeover.

IMG_4520

The fabric and paint cost a total of $25, so $12.50 per chair. I’ll take that price any day. One more before and after!

PicMonkey Collage


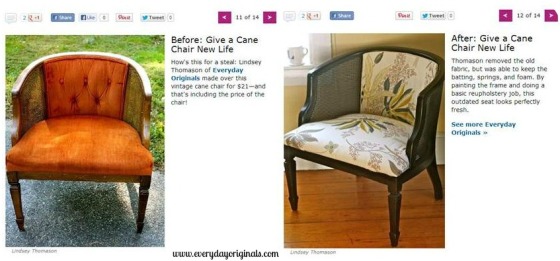
countryliving.com feature!

So a few weeks ago this awesome thing happened. It was 8:30 at night on a Tuesday, I was winding down, checked my email on my phone real quick. Erupted in screams.

An editor from Country Living Magazine had reached out to me. At first, well, after I got really excited I investigated to make sure it wasn’t spam. You get so much spam as a blogger. It wasn’t. It was legit. They wanted to feature my cane chair makeover in a Bloggers’ Best Furniture Makeovers story that would be running on their website.

And then it happened and it went live and here it is!

chairs screenshot

Take a look over there at the feature, and check out some of the other projects too. I’m thrilled to have been chosen to be a part of this. And, I can’t wait to share the new chairs we just scored that are about to get a makeover just as good as this one!

screenshot created from countryliving.com

a peek into the archives: cane chair makeover

To celebrate EO’s 3rd Blogiversary we’re taking a peek back into the archives. There are lots of great posts and information in the archives so I thought I’d re-visit some this week. Enjoy!

It’s finally done. Thank goodness. Am I in love? No. Do I enjoy it for now in the room we have? Yes.

I started the cane chair makeover way back when…

It took me months to decide on a fabric and honestly, I don’t love the one we chose. I like it and it coordinates with the other colors in the room that we can’t change (like the walls) so it works for me.

After carefully taking apart the entire chair I was left with this:

The best way I found to redo the chair was to save every piece I removed and just replicate them with the new fabric. I did things like, use giant rubber bands to keep the fabric in place so that I could really see where the pattern was going to lay on the chair, before stapling it down.

While I worked on getting the fabric in place Al worked on painting the chair. I was going to buy new paint but then we decided to use some left over spray paint we had first to see how it looked. We used the rest of the oil rubbed bronze can we had and we actually loved it.

It’s tough to tell in this terrible night-time photo, but it gives the chair a little bit of a shimmer when the sun hits it which is fun instead of a plain flat black.

Once I had the fabric patterns where I wanted them, all lined up, I started stapling it into place. This is where my efforts stalled. My staple gun wasn’t heavy-duty enough. So Al grabbed one to borrow from his dad. But then the staples weren’t long enough. So we went and bought longer staples. But they still wouldn’t staple through the fabric and padding and piping. So I had to change up my plan of attack.

We ended up stapling everything we could, again we followed it completely to how it was when we took it apart, so all chairs will be different.

Once everything was secure, I actually hand sewed the piping on. There are about two spots where you can see some thread but really only if you’re looking for it. My fingers were raw and burning and it took me forever but I think it was worth it because it looked pretty good in the end.

The final result left me very happy with our work.

One last before and after:

The final cost breakdown was:

$6.99 for the chair, $12 for fabric and piping, $3 for staples. A total of $21.99 plus some tax.

Not too bad. What do you think?!

yard sale steals and deals

Yard Sale season is in full swing and I couldn’t be more excited. While my foot is just now starting to feel a bit better, I’m not doing any long distance walking, but I can hop out of the car for a quick scan over when needed!

This was my sister’s car packed FULL with finds all from just a few different yard sales. You can’t see the backseat, but let’s just say my mom barely had room to sit!

Here are some things I’ve stumbled upon…

A ceramic pot for our garden: $2

Silverware basket that I’ll be re-purposing: $1

Finally, a legit recycling bin: $1

Yes, I did buy this fan. The fan in our bedroom died like two days earlier: $3

Syrup dispenser and other dispenser for olive oil and canola oil: 10 cents and 50 cents

A clear one of these (they’re hard to find!): $1.00

For flowers because it’s so cute: $3

Another clear hanging thing: $1

I’m psyched with all my finds. When I yard sale I don’t buy things just to buy, I make sure I have a use for or needed everything. I’ll share with you how I used these things in the next few weeks! Oh, and another score I found that’s not pictured, a brand new North Face jacket for FIVE BUCKS. That’s like stealing right there.

Have you guys found any fun yard sale items lately?

a new media console

After we put all the hard work into our curbside find I finally was able to get it into place. We let it sit over night, probably for about 30 hours total, before putting it all together. First I had to replace the knobs that were on it. I had a few of these striped knobs, from Hobby Lobby, that have been waiting to be used. I love them with this piece. They add just enough of a fun pop to the neutral piece.

We decided to use the piece as a console type stand under our television. The TV is on the wall so we needed somewhere to stash the cable box, modem and blu-ray.

I was able to combine two piece of storage into one with this perfect find. Originally we had this piece working as home base for the cable box and we had this piece housing games, DVD’s and blankets. And then I had a basket on the bookshelf stashing extra batteries, flashlights, etc.

Now, everything fits in this one piece. Batteries, flashlights, extra remotes in the drawer; games & DVD’s in the cabinet and everything else placed on top.

I’m thrilled with it. And just by removing the chest that was stashing things it seems like there’s lots more open space in the room. The total cost of the whole project was just under $4 — only paid for the can of primer. Everything else was either free or already owned. Ahhh gotta love the curbside finds!

a curbside find i never knew i needed

Back in March, when my cousin came home from overseas, we headed out to the store to pick up some poster board so I could make big colorful signs to welcome him home. It was almost 9 pm and pitch black when my dear husband eye spied and amazing piece of furniture on the curb, just a few houses down from ours. There was another lady in her Volvo approaching the same piece so we had to act quick. He jumped out, gave it the once over and threw it in the back of the car. FREE. My favorite word in the whole world.

Let me tell ya though, this thing was in rough shape. But just the type of rough shape that I like. That’s some sort of oil stain on the top and I had to clean it, like scrub clean the whole thing, at least three times.

And there was definitely still some dirt that we just painted over and pretended it wasn’t happening. We both got splinters from this project too. Goes to show it was a good one. Al may or may not still have some wood in his hand.

After we really scrubbed it down, we sanded it. Kind of lightly, but very thoroughly. I also went around and made sure that it was all smooth and there were no more slivers sticking up.

I decided to go for a spray primer just to simplify the process. Though, more and more I’m leaning towards spray primer. It’s just so easy and clean and easy. We used a Rustoleum brand primer.

Al primed the whole thing and I made him wear a mask. That’s my new thing, mask wearing while spray painting. He fought me on it but I won. He primed and we let it sit for a bit before painting.

The paint was a free sample can that I got at an Ace Hardware. Whenever I have a free sample of paint I always go get it before it expires. I’ll usually get it in a neutral color because I know I can always use it for something. This one was Benjamin Moore’s Silver Half Dollar. Only problem with the samples is that it’s always a flat base, so I might add some sort of gloss to this when it’s done.

He gave it two nice smooth coats of paint, letting it dry in between and now I’m just letting it set for a bit before adding better knobs and putting it into place. I’m thrilled with the way it turned out and it’s going to be perfect in our living room.

And in case you were wondering, when we went to the store to get poster board they had none. So I used a card board box and the backside of wrapping paper for posters instead. But, I wasn’t even annoyed at the lack of poster board because all I could think of was my sweet piece of free furniture in my trunk!

cane chair makeover

It’s finally done. Thank goodness. Am I in love? No. Do I enjoy it for now in the room we have? Yes.

I started the cane chair makeover way back when…

It took me months to decide on a fabric and honestly, I don’t love the one we chose. I like it and it coordinates with the other colors in the room that we can’t change (like the walls) so it works for me.

After carefully taking apart the entire chair I was left with this:

The best way I found to redo the chair was to save every piece I removed and just replicate them with the new fabric. I did things like, use giant rubber bands to keep the fabric in place so that I could really see where the pattern was going to lay on the chair, before stapling it down.

While I worked on getting the fabric in place Al worked on painting the chair. I was going to buy new paint but then we decided to use some left over spray paint we had first to see how it looked. We used the rest of the oil rubbed bronze can we had and we actually loved it.

It’s tough to tell in this terrible night-time photo, but it gives the chair a little bit of a shimmer when the sun hits it which is fun instead of a plain flat black.

Once I had the fabric patterns where I wanted them, all lined up, I started stapling it into place. This is where my efforts stalled. My staple gun wasn’t heavy-duty enough. So Al grabbed one to borrow from his dad. But then the staples weren’t long enough. So we went and bought longer staples. But they still wouldn’t staple through the fabric and padding and piping. So I had to change up my plan of attack.

We ended up stapling everything we could, again we followed it completely to how it was when we took it apart, so all chairs will be different.

Once everything was secure, I actually hand sewed the piping on. There are about two spots where you can see some thread but really only if you’re looking for it. My fingers were raw and burning and it took me forever but I think it was worth it because it looked pretty good in the end.

The final result left me very happy with our work.

One last before and after:

The final cost breakdown was:

$6.99 for the chair, $12 for fabric and piping, $3 for staples. A total of $21.99 plus some tax.

Not too bad. What do you think?!

recent finds and projects…

I’ve been in the middle of working on a few random, small projects here and there. Many of them involve paint though, so my operation was halted this weekend when it was 20 degrees and way too cold to paint outside. When it’s too cold or too hot outside you risk the paint not drying properly and evenly. So, I’m hoping today or tomorrow is a little warmer so I can get some painting done.

In the meantime though, thought I’d share what I’m working on. First, my favorite is this $6 lamp I picked up at the thrift store.

I’ve been hunting for a lamp for my desk for a while now and this one was perfect. I loved the detail and the curves of the base. Though, I think it was most definitely straight out of an 8-year-old boys room and it had a baseball themed lampshade or something. So I’ll be making that over with a nice coat of paint. It came shadeless so I set out to find one. I eye spied this one in Target and it was on clearance for just $5.08. (Forgot to take the plastic off the shade. It won’t normally reflect/shine like that!)

I think it was on clearance because the base was missing from it. It was the exact shape and size I was looking for. I haven’t decided yet if I’m going to keep it navy blue or jazz it up.

I’ve also been back working on this chair. We went back and forth on fabric and colors for the longest time and finally found something that works great with the rest of the living room. Here’s a sneak peek of what we chose…

Not my typical choice of fabric but I’m loving how it’s looking on the chair.

And in other fun find news, we scored this amazing antique side table at Goodwill for $6.99!

Al spotted it and it was perfect for right next to our new couch…!

We decided to sell the other couch we had (for more money than we bought it for!) because it just fell too large in the room. We picked this one up at the Jordan’s Clearance center. It’s so much more comfortable, fits better in the space and allows room for a side table, which we couldn’t fit with the other couch.

So, that’s my weekend update. Hopefully I can get some painting in soon!

operation hoosier makeover: complete

I could probably drag out the posts about my hoosier to at least 4, because I have so much to say about it. But, I’ll save you all the annoyance of 4 posts on one piece of furniture.

We decided to paint it a soft gray, though the finished photos make it look more of a bluish color.

We started by removing all of the hardware, hinges, handles, door, drawers… anything that could be removed really. I lined up all the handles on a piece of cardboard so they could be easily spray painted. I sprayed them Rust-oleum’s oil rubbed bronze.

We took the hoosier apart and brought it outside to sand it. Al sanded and I began priming after him. We did one thin coat of primer with some tinted gray primer that we already had.

Because we used the tinted primer, one coat of paint covered it just enough. It was a hot day so we had to work quick because the paint was drying at record speeds. After sanding, priming and painting it was time to bring it back in the house.

We put all the doors, hinges, handles and drawers back on and cleaned it all up. I decided to cover 4 of the glass panes and leave one open.

This was so simple. I used scrapbook paper that was 19 cents per sheet and some double-sided tape. I cut each sheet to fit the glass and then used the tape to stick it on. You can barely see the tape, and for now it’s just a temporary solution until I decide what I want to do permanently.

Okay, so the final product. Here it is. My most favorite makeover to date. The home to most of my kitchen things…

The placement of it in our kitchen made it reallllly challenging to photograph, but I did my best.

What do you guys think? Love it/hate it? I know it’s not the type of furniture everyone would love and some people might think we’re nuts because we made over an antique. For us though, it’s perfect. We love it and it holds all the things a kitchen should, that ours can’t because there are no darn cabinets!

operation hoosier makeover

First, a very Happy Veteran’s Day to everyone and a great big THANK YOU to all who have served and continue to serve our country…Land of the free, because of the brave!

—————

This is by far the most exciting project we’ve done to date, which is why it’s going to have two parts to it. Mostly just because I have a lot to say about it.

I’ve always loved hoosiers. The storage they allow is amazing and the extended counter top is nothing to complain about.

Way back in March when I was training for the Marathon I’d run from our house to my parents house, about 20 miles. It meant that once I got there, showered and ate I’d go shopping with my mom. Which is kind of dangerous, but always exciting.

This particular day we stumbled upon a hoosier at an antique store. With a lot of convincing to this guy named Al, who was certain we did not need this behemoth piece of furniture, it came home with me that day.

It had been in the store for a while and they were really trying to move it. The price started at $699, marked down to $350, marked down again to $299. The kicker though…it was St. Patty’s day weekend and if you had green on you got an extra 15% off. So that’s when the call went in to dad to get over here wearing green.

It comes apart into three sections, the top, bottom and counter, so we were able to fit the entire thing in my Mom’s SUV. I think it’s my most favorite piece of furniture that we own.

But, do you see those photos? It’s hideous. I’m not even sure what color to name that greenish one on the inside. And it gave me anxiety knowing everyone that came into my home could see behind those glass doors. So, that’s when operation hooiser makeover began.

Stay tuned for the final product, it took us 6 months to decide how to make it over and actually do it, but I promise it won’t take that long to show you the new photos!