diy faux drawers

We bought some of these storage boxes at Ikea for a bargain price in the As Is section. We got the two pack for $3.99. After they fit perfectly in the intended space we purchased another pack at the full price of $9.99. But still, $3.50 per box is a great price for large, sturdy storage boxes! When stacked on top of each other though, I felt they looked a little boring; so I decided to create what looks like a drawer that separates them. This was probably one of the easiest projects I’ve ever done.

fake drawer 1

I used two priority mail boxes that I had. Yes, I felt guilty since the post office is hurting, but I had the boxes and never used them (I think what I was planning to ship in them didn’t fit) so instead of recycle them I re-purposed them. I know I could have brought them back to the post office but I didn’t. Okay, confession made, moving on.

fake drawer

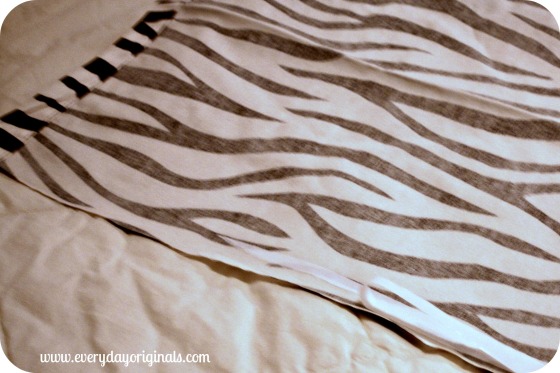
I started by slicing a hole in the cardboard in the spot I planned on adding the knob to. I then used fabric I already had, as well as drawer pulls that were in my stash. It was as simple as wrapping the boxes in the fabric, just like you would wrap a present. However, when I wrapped the box I left the far end unwrapped so that I could add the knob. Using scissors I slit a small hole through the fabric in the same spot where I made the hole in the cardboard. I secured the drawer pull onto the box and then continued wrapping the back-end of the box.

fake drawers 2

That was it, done! I placed the fake drawer between the two storage boxes and I love the way it looks. It adds a little dimension, a nice subtle pattern and makes the whole space look a tad more visually appealing. The fabric is even the perfect coloring to go with the storage boxes I made for free. Now, I totally get that they don’t actually look like a drawer, but I like the idea of it and the way they come out.

Nothing like completing a great, simple, free project! Next up is getting control over those wires and cords. For the love isn’t it time everything be wireless now?

no-sew diy shower curtain drapes

I’d like to think that I would have a long post about these DIY curtains. But, in reality, they were so simple you could probably make them with your eyes closed. Okay, well don’t try that because there is an iron involved.

Now, I completely understand that animal print is not everyone’s cup of tea. But I always have, and continue to, love a little pop of it here and there. When I found these two shower curtains for a steal at TJ Maxx, one for $7 and one for $10, I knew they would be prefect for our large living room windows. And if you’re wondering why the exact same shower curtains were different prices, I have no idea. But I will tell you that I obviously argued with them and the $7 one was actually $12 to start. When they were running the sku’s they realized it should be on clearance. So that was a lovely surprise. Anyway, back to the curtains.

window

They were too short for the windows but I had some leftover white fabric so I knew exactly how I would lengthen them. I started by folding each shower curtain in half perfectly. I did this on the floor because I needed a space large enough. Once I folded them in half I then cut perfectly on the fold line. I eventually had four pieces.

hem tape

I measured the width of each piece and measured what the added length would be that I needed. With those measurements I cut out four additional pieces of fabric from the white scraps that I had. Using heat bond iron on tape I then ironed the white pieces to the main pieces. Since each panel had a cut side, where I cut the full curtain in half, I didn’t want it to fray. So using another strip of heat bond tape I made a fold on the edge to create a hem.

extended length

That was it! It was really easy and I actually loved making drapes out of shower curtains. It’s a heavier duty fabric so it was easier to work with and falls nicely. It also already had the holes to hang it so I didn’t need to make any or get those ring clips.

final shower curtain drapes

We hung them from our DIY curtain rods and I love the way they look. Nothing is complete yet, is anything ever complete?! We still have to paint the rods and add finials. Once it warms up more we can get outside and spray those. What color would you guys paint the rods? I can’t decide and it’s driving me nuts.

loops

Since I already had the white fabric the final cost of each was $4.25, plus some tax. Not bad for four drapes! We love the way they pulled the room together, especially since it’s such an open space. Okay so in the end I guess I did have a lot to say. Either way, they were so easy and inexpensive to make, so the next time you’re on the hunt for drapes, don’t skip the shower curtains, you never know what you might find!

diy hopscotch mat

I made this hopscotch mat as a Christmas gift for the girls I was nannying for before we moved to CO. And when I say for Christmas I mean that I just mailed it to them a week ago. It’s the thought that counts, right?

The end result was super cute but I ran into a lot of sewing issues during the process which is why it took me so long to get it to them. I have to un-sew it like at least 5 times. But let’s start from the beginning.

supplies

First, I bought two colors of fleece (with a coupon!) from Joann fabrics. I cut out the size of the mat and the size of each hopscotch square. For numbers 1 & 4 I cut the same sized squares. For 2/3 & 5/6 I cut out the same sized rectangles. And then for number 7 I cut out half of an oval.

After I had my pieces cut out I then printer on the computer the numbers 1 through 7. I made them large enough to fit each grey shape I had cut out. I apologize that I don’t have any exact dimensions or the exact font size. You know me, I’m not good at tracking those details. I need to get better at it. Anyway, I printed the numbers and then cut each out. I pined each number to the light pink fleece and cut them out again. So then I had all seven numbers cut out in the pink fleece.

fleece numbers

I pinned each number to its respective grey piece of fleece and I very carefully and slowly sewed each one on. Surprisingly this step was the easiest of this whole project. It took me a little while but as long as I was taking my time and watching what I was doing it was quite easy to sew the numbers on.

Once I had all the numbers sewed on I positioned each grey piece onto the pink and pinned them. This is where the horror started. The fleece kept stretching every time I tried to sew the pieces together. So no joke at least 5 times I tried sewing it and then I would un-sew it every time. So after weeks and months of getting so frustrated I was ready to give up. But then obviously superman Al swept in and was all encouraging and was all maybe there’s a different way you can make it.

squares

So I resorted to the iron on tape. I positioned all the pieces the same way and I used the heat bond tape to secure them all. It worked fine, but I had all these cute visions of a zigzag stitch outlining each hopscotch piece. After all was ironed together (I simply followed the instructions on the heat bond package) I let it settle for about a day. Then I picked up some sequin ribbon in the dollar section at Target. I hot glued that around the entire perimeter of the mat.

hopscotch

Once it was complete I thought it looked really cute. I rolled it up, wrapped it with a bow and mailed it off to the girls. I only hope that it stays together. Darn fleece on fleece sewing!

Have you guys been sewing up anything cute lately? Having a better experience than I am?!

a peek into the archives: small space photo collages

To celebrate EO’s 3rd Blogiversary we’re taking a peek back into the archives. There are lots of great posts and information in the archives so I thought I’d re-visit some this week. Enjoy!

Even though our living room has such little wall space I wanted to be sure to still hang some photos of family and friends. However, I knew I wasn’t going to be able to pull off a large photo wall like I did in our last two apartments. So, instead I created two photo collages. I picked up two 11×14 frames at the thrift store.

I think I paid $2.99 each, or somewhere around there. We spray painted them black, which we already had on hand. I gathered together all the photos that I wanted to include in the frames, but I ended up having too many so I had to pick and choose.

Using my cutting mat, rotary cutter and yard stick I started trimming and sizing each photo. I decided to do this first instead of figuring out a layout first. Many of the photos had plenty of space to be chopped off, which made it was easier for me to trim them to size and then arrange.

I used a light colored linen fabric to cover the photo mats that came with the frame. I simply wrapped the mat like it was a present and taped the back side of it. Once the mats were covered and the photos were all cut I arranged and re-arranged one hundred times until I found the perfect setup where they all fit.

I went ahead and washed the glass on both sides and reassembled the entire collages.

Don’t mind the crazy flower petals and leaves overlapping the collages. I’ll share the whole wall when it’s complete! I’m entirely satisfied with how they turned out though. I love the smooth lines and the mix of color and black and white’s. It’s hard to capture the color and texture of the linen background here, but it’s such a lovely backdrop to the photos.

I’d love to know how you all hang/share photos? Picture frames? Collages? Does anyone have one of those digital frames? I love the idea of the digital frames but I’ve heard they use a lot of energy. Thoughts?!

april pinterest project: t-shirt shag rug

I’m loving doing my Pinterest projects! This month I made a t-shirt rug using old white t-shirts of Al’s. For awhile I’ve been wanting a small roundish rug at the top of the stairs between each bedroom. It’s a tiny landing and I thought it would look better with a little rug and it would be nice and cozy on cold toes just waking up.

I started with a large pile of t-shirts, collected over a while. Every time one would be worn out and grungy I’d take it from Al and put it in my pile. I wanted all white but you could do all different colors (like in the tutorial I followed). I followed this tutorial that I had pinned on Pinterest.

I started by cutting one t-shirt in half and then cutting out an oval shape for the base of my rug.

Then I cut two entire t-shirts worth of 6 inch long, 1 inch wide strips.

I then made vertical and horizontal snip-its in the oval shape. I alternated doing one row horizontal, one vertical and so on. When I was done I had a big oval with lots of holes.

I started to thread the strips through the holes. I’d pull it through the hole and then loop it around back and pull the other end of the strip through another hole close by. Then I’d start with another strip and thread it through one of the same holes that there’s already a strip in and loop it through to another empty hole. Is this making sense? The tutorial probably explains it better!

And then I get really excited and on a roll and forget to take photos of anything during the process. Check here for photos during the process.

I did this for a long while, easy but time-consuming and a bit tedious. I sat and watched the Bruins game while I did it. Definitely a mindless, in front of the TV project.

Once all the holes were filled I went through and made a few extra, random snip it’s where there were open spaces. I threaded more strips through until it looked fuller.

I was really pleased with the outcome! It’s just a tiny rug, I’m not sure I would have had patience for much more than that, but it’s the perfect size, texture and dimensions that the top of the stairs needed.

For cleaning purposes I figure since it’s not a high traffic shoe area, I’ll probably shake it outside gently pretty often. When washing is needed I’ll put it in a mesh bag to wash so that all the pieces stay together.

What about you guys? Have you been working on any Pinterest projects lately? I’ve been working on them a lot more now because I’m just loving the inspiration and ideas!

desk lamp makeover

I finally got around to finishing up my thrift store lamp and lampshade that I stumbled upon a few months ago. The lamp sits on my desk and there are a lot of colors and patterns in the vicinity, so I wanted to keep this pretty neutral. However, it ended up a little too neutral!

Here’s the before again… most definitely a lamp from an 11-year-old boys baseball themed bedroom. At least that’s where I’d envisioned it.

It didn’t have a shade when I bought it but I found a clearance one at Target for $5.08. You’d think they could just make it five bucks, that eight cents really makes a difference.

I bought the shade knowing that I wouldn’t use it as navy blue, it was the most inexpensive so that’s why I grabbed it. I went through my leftover fabric stash at home and found a great off white linen that I had leftover. I cut it to fit the shade, with a little left to make a smooth seam in the back and a little longer on each end to make a smooth seam at the top and bottom. To start I wrapped the shade in the fabric and hot glued it down.

I left the extra fabric on the top and bottom so that I could I fold it over to make a smooth seam without any fraying, etc. I used a dab of glue to hold it in place against the other side of the fabric.

I then hot glued around the very edge of the shade, in small 3-4 inch increments, and tightly pressed the fabric over the edge until it was secure.

The shade came out pretty good, especially since I haven’t covered a shade in about three years. I wanted to paint the actual lamp a light gray color. It was a Krylon spray paint called Pewter Gray and it looked like a very light, soft gray. Well, the can lied. It came out a very light, soft blue color.

I was super bummed, especially because I used the same paint for something else that I wanted to be light gray, which is now light blue. For now it’s staying the way it is. Maybe it’ll grow on me?

I love the overall look of the lamp much better, the color just wasn’t exactly what I was going for. And I think the neutral linen shade would look better with a darker (not lighter) lamp color. So, there may be some tweaks in the future.

I also think I might want to experiment with jazzing up the linen shade a bit more. I used the linen because it was what I had but maybe adding some stripes or zigzags or something?

Not sure yet. For now though, I’m happy it’s not straight out of a child’s room! The final cost for the project was:

$6.00 – lamp

$5.08 – shade

$3.99 – paint

Free – fabric

For a total of $15.07. Not bad for a new desk lamp!

photo collages for small spaces

Even though our living room has such little wall space I wanted to be sure to still hang some photos of family and friends. However, I knew I wasn’t going to be able to pull off a large photo wall like I did in our last two apartments. So, instead I created two photo collages. I picked up two 11×14 frames at the thrift store.

I think I paid $2.99 each, or somewhere around there. We spray painted them black, which we already had on hand. I gathered together all the photos that I wanted to include in the frames, but I ended up having too many so I had to pick and choose.

Using my cutting mat, rotary cutter and yard stick I started trimming and sizing each photo. I decided to do this first instead of figuring out a layout first. Many of the photos had plenty of space to be chopped off, which made it was easier for me to trim them to size and then arrange.

I used a light colored linen fabric to cover the photo mats that came with the frame. I simply wrapped the mat like it was a present and taped the back side of it. Once the mats were covered and the photos were all cut I arranged and re-arranged one hundred times until I found the perfect setup where they all fit.

I went ahead and washed the glass on both sides and reassembled the entire collages.

Don’t mind the crazy flower petals and leaves overlapping the collages. I’ll share the whole wall when it’s complete! I’m entirely satisfied with how they turned out though. I love the smooth lines and the mix of color and black and white’s. It’s hard to capture the color and texture of the linen background here, but it’s such a lovely backdrop to the photos.

I’d love to know how you all hang/share photos? Picture frames? Collages? Does anyone have one of those digital frames? I love the idea of the digital frames but I’ve heard they use a lot of energy. Thoughts?!

adding casters for more functionality

I’m gearing up to share our finished living room with you guys so I’m trying to get all the small projects posted before them. Remember this chest I used for linen storage at our last apartment?

Well, in this place it serves a different purpose. We needed storage for games, movies and blankets in the living room and I had the perfect place for the chest. I wanted it to be a bit more mobile though.

Adding mini casters was the best option. They were $1.49 per caster at Lowe’s and it took Al about 5 minutes to attach them all.

It took some organizing to get everything to fit in there but I was able to do it in a way that you can see the titles of movies and each game. I simply fold the blankets and rest them on top.

Having it on casters is great because we can roll it around, use it as extra table space and set up a game on it. It fits perfectly under a window in our living room and one day I will get around to painting it. How do you guys store games and DVD’s if space is limited?

Anyone have fancy plans for the weekend? Have a good one!

reupholstery anyone?

Recently an EO reader reached out to me wondering if I’d like to take two, almost complete, reupholstered chairs off her hands. Unfortunately, we have no space for the chairs, as much as I would have loved them. She has kindly offered them to anyone who would be willing to come pick them up from her. She’s located in Medway, MA…so if you’re located clear across the country this probably won’t work for you.

Here are the details: she has 2 wing back chairs, one is 90% complete the other is 50% complete. She has all of the tools, fabric and the instruction book. I’ve included a few photos below.

Anyone looking for a project? Anyone in need a few extra chairs? This would be a great way to learn how to reupholster at no cost to you. Email me at everydayoriginals@gmail.com if you’re interested and I can send you more details and put you in touch.

one perfectly functional camera bag

These and these are both really cute, really expensive camera bags. Tons of different styles on both sites and they’re all great. But, it’s not in the budget right now for me to get a new camera bag just for the heck of it. I have two perfectly good ones, but I love the idea of being able to use this as my camera and my purse.

For weeks I had been scouring through consignment and thrift stores. And then I found this:

And it cost me:

It was the perfect size and the straps were long enough that they would be comfortable on my shoulder with all the weight in it.

The first thing I needed to do was figure out a way to cushion the inside so that my camera had a nice soft surrounding. After I chose the fabric that I wanted it lined with I started looking around for what else I could use as cushion before resorting to buying something. Turns out we had about two extra yards of orange fabric from Al’s 2009 Halloween costume that I have been dying to either use or get rid of.

The orange fabric was a heavy-duty, soft lined cotton, and clearly, was just what I needed.

Inside the bag I measured the height, width and depth of each side and cut pieces to size of the pretty fabric and the solid orange.

I had 4 layers of the orange fabric and one of the decorative. I sewed all of the pieces together to make a cushion that fit perfectly into the bag. I also sewed two strips of velcro onto the decorative fabric on each of the long sides of the bag.

I then hand sewed the insert to the lining of the bag. You can see how the zipper pocket that was already in the bag is still usable.

I removed the camera dividers from one of my other camera bags. Since they already had the velcro on them I simply had to place them into the bag and arrange them how I wanted against the velcro I sewed in on the sides. Final product: a functional, camera bag that holds all of my regular purse items too. Items that are in the bag: wallet, cell phone, small makeup bag, camera with lens, telephoto lens, battery charger, lens cleaner, small notebook, pen, small point and shoot camera and USB cord.

Here it is all closed up and ready to go:

All for a grand total of $5.49. I love it. Love, love, love it. I used it last weekend for my brother-in-laws graduation celebration in Boston and it was perfect. Not too big, not too small. You can also see in the photo that I have an extra divider in there, just in case I ever need to rearrange. It’s perfect, and for the time being makes me feel great about not spending a whole lot more on it!