frozen banana sandwich

It’s no shocker that I love dessert. I’m always searching for ways to make it healthier though and this one we really loved. It’s so easy and tasty.

Ingredients:

  • banana
  • nut butter: any you have on hand, I used sunflower butter
  • chocolate chips

ingredients

Peel the banana and slice in half the long way. Carefully spread the nut butter. If you’re not careful the banana will break apart. Sprinkle chocolate chips onto the nut butter and place the other half of the banana on top. Carefully squish the two together. Place on wax paper and freeze for at least an hour.

photo 3

One thing we realized once eating it was that we should have sliced them into little bite sized sandwiches. They would be great to grab a few and pop them in your mouth for a cold treat. Either way, no matter how you eat it, it’s delicious and healthy and cold. Which is perfect for hot summer September nights.

photo 5

Enjoy (sorry for the bad iphone photos)!

hanging mason jar vase

This was a project that I’ve seen on Pinterest in a few different styles. I thought we had the perfect space for it and it seemed fairly easy to make so I decided to try it out. The process was easy and inexpensive. I used the following:

  • 1 sheet of scrapbook paper (may need more depending on your wood size)
  • Piece of wood (could use any scrap wood you have lying around. I didn’t have any so grabbed a scrap from Home Depot)
  • Hose clamp (bring your jar with to make sure you get the right size)
  • Mason jar
  • Mod Podge

supplies

I roughed up the piece of wood by lightly sanding, then I cut the paper to fit the size of the wood. I painted a light coat of mod podge onto the wood. Carefully, I placed the sheet of paper on and smoothed it out so there were no bubbles. I then painted another very thin coat of mod podge over the paper.

bubbles

I let dry for a few hours until it wasn’t tacky to touch. I used a picture hanger to hang the hose clamp, as you can see in the photo. Once I secured that the hose clamp hung right off of it.

hook

Once it was attached I secured the Mason jar. The hose clamp is adjustable so I loosened it to insert the mason jar and then tightened it until the jar wouldn’t slip through. I tested it out by filling half full with water before hanging and adding water and flowers to ensure the jar didn’t slide out. It didn’t!

flowers

Since we have these insane walls that are near impossible to nail into I used a 3M strip to hang it. I grabbed the ones that hold up to twelve pounds, followed the instructions on the package and hung.

final

Such a simple, inexpensive, wall hanging. The total cost break down was:

  • Wood: $0.50
  • Paper: $0.29
  • Hose clamp: $2.00
  • 3M strips: $3.00
  • Mod Podge, scrap-book paper: already had

Love $6 projects! We hung it in our kitchen/dining area but I’m thinking I might make a few more with different paper and larger mason jars to hang in the living area. I also love the idea of making them with wine bottles. Hmm maybe I’ll do that instead!

high five for friday!

We’ve made it to the weekend! Nice short week was great. We’re looking forward to having a weekend at home. First time in about five weeks! What’s good with you guys? Have a great weekend!

PicMonkey Collage

1. First time at the U.S.Open!

2. Why is texting with Moms so amusing? I’ll need to clarify auto correct to her and that texting is not email.

3. Friends at the U.S. Open. Haven’t seen them for 10 months!

4. The sunrises in Colorado never get old. I love my commute to work for this peaceful reason.

5. Found these two lovely ladies in NYC. Hadn’t seen them for a year!

paint “dipped” birdhouse

I’m loving the paint dipped look these days. It’s all over Pinterest and the blogosphere – paint dipped wooden spoons, chair legs, table legs and more. I’ve also been really drawn to birdhouses lately and I thought a cute paint dipped one would be a great addition to my desk at home.

final

I do find that the actual dipping process can be quite wasteful of paint so instead I hand painted my birdhouse to give it the same dipped look. I used paint that I already had and grabbed the birdhouse for a few bucks at Michael’s, with a coupon.

unfinished

I taped off about where I wanted my color line to meet my white line. I painted the teal color underneath the tape in three, thin coats of paint, allowing each coat to dry for at least 30 minutes. Number of coats would depend on the type and color of paint you’re using.

painted line

Once I let the final coat of teal dry for about an hour I carefully peeled off the tape. I then painted the rest of the birdhouse white. I have a pretty steady painting hand so I was able to paint along the teal line without slipping. If you don’t have as steady of a hand I would suggest painting the whole thing your base color and then adding your dipped part second.

painted

After two coats of the white paint I had a cute little birdhouse to sit on my desk! You can see on the white part that I did fewer coats of paint. I liked the look of the raw wood showing through a little. Have you guys been up to any simple, inexpensive projects lately?! This would also be a great project for kids, with the help of an adult!

high five for friday!

It’s been a few weeks since I’ve posted a H54F! We’ve been busy with traveling and friends and town and we’re gearing up to head out-of-town again this weekend. Highlights of our week was having friends in town. And then that one recipe I made that was awesome. Have a great long weekend!

PicMonkey Collage

1. College roomie in Denver!

2. Friend from home in Denver on the same weekend!

3. Free money museum…always a good time.

4. Coors Brewery!

5. Amazing recipe served over white fish. Simply combine the following and EAT!

  • 1.5 peaches peeled and diced
  • 1/2 of an avocado diced
  • 1.5 roma tomatoes diced
  • 1/2 teaspoon of lime juice
  • sprinkle of basil (either dried or fresh)

canning peaches without using a canner

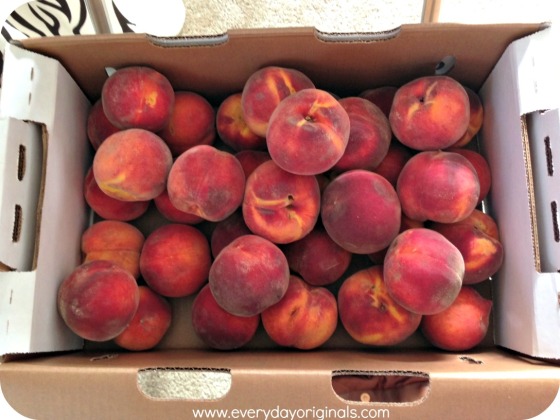
Out here in CO they don’t have u-pick farms easily accessible. Normally I enjoy a nice day of picking fruit and then canning it or making jams. I had to make do this year since there’s no u-pick, which is how I ended up with 20 pounds of peaches from the farmers market. Al’s face was hilarious when I walked up to him with my massive box of peaches.

A local (and by local I mean many hours away from the city because no, there are not peach trees IN Denver) farmer was selling imperfect peaches for half the price of perfect ones. So I scored 20 pounds of peaches for $22. Which is amazing. And the truth is many of them had absolutely nothing wrong, and the ones that did were either bruised or misshapen. Nothing that was going to poison us.

box of peaches

I don’t own a canner, but I needed to get canning right away because they were ripe and I didn’t want them to go bad.  So instead I used a huge stock pot and it actually worked out perfectly with a few small adjustments. I do own this canning kit that my sister gave me as a gift, and I will say if you plan to do a lot of canning it makes the process a whole lot easier.

final

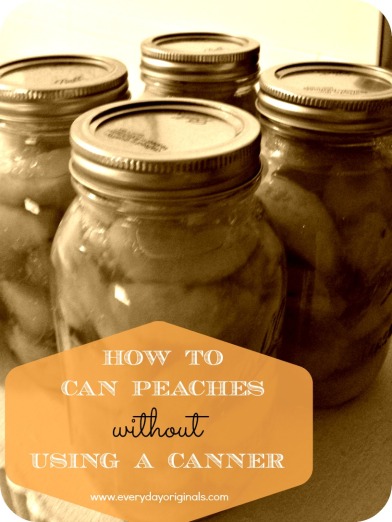
Here’s the process I used and I’m happy to report that it was successful. Happy canning!

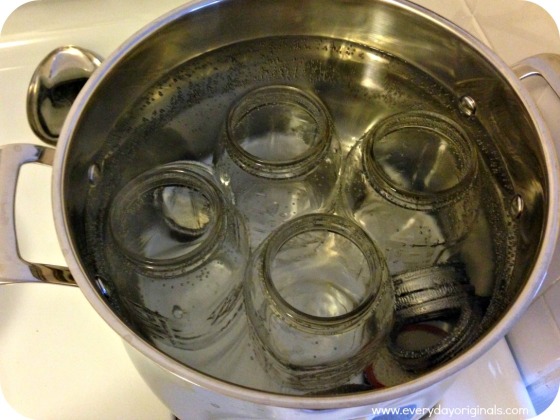
1. Wash all jars and lids with hot soapy water. Once clean, submerge in the large stock pot and boil for 10 minutes to sanitize. I’ve heard you can also do this in a dishwasher on the sanitize setting. #iwish #whatdishwasher

boiling jars

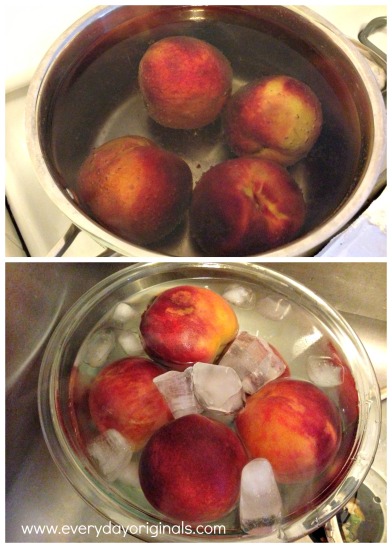
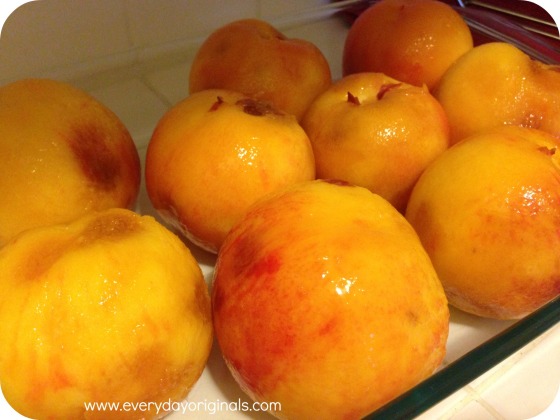
2. In a separate pot while those are boiling submerge the peaches in boiling water and let sit for 60 seconds. Remove with a slotted spoon and place peaches in a bowl of ice water to stop the cooking process. Once cooled remove the peaches and the skins will peel right off. It’s messy, but worth it.

PicMonkey Collage

3. Remove the pits and dice or slice up the peaches however you like them. I slice ours. Fill each jar with the peaches. Don’t overfill the jars but do shake them a little to fill in any open spaces. Fill the jars to about 3/4″ below the top of the jar.

skinned peaches

4. Bring 6 cups of water to a boil in a sauce pan. Add 2-3 cups of sugar (I used 2, but we don’t love super sweet fruit) to the water and stir. Lower heat to medium and continue stirring until a syrup has formed.

5. At this point you can add 1/2 tsp. of ascorbic acid to each jar to prevent browning. You could also soak the peaches (before placing in jars) in a lemon juice mixture. I can’t speak to either method as I had neither of those on hand, but I really didn’t want brown peaches. I only had lime juice. So, well, I added that. I didn’t measure, just a big squirt into the syrup. I did taste it and it was quite delicious.

6. Pour the syrup into each jar up to the bottom of the threads. With a cloth dry off the threads to ensure there’s no moisture. Secure each lid onto the jars.

7. Fill half of the large stock pot with water. When the water reaches 180 degrees carefully add the jars. Now, this is where I had to make some changes since I didn’t have a canner. I never let the water get to a vigorous boil because I didn’t want the jars to clunk around. So instead of heating the water on high I heated it on medium, which obviously took longer. I carefully lowered each jar into the pot making sure none touched each other. Once they were in there they fit quite snugly and I continued to cook the water. Make sure the water level is 2″ above the top of the jars.

8. Continue cooking over medium heat until the water comes to a boil. Again, not a vigorous one, my boil was very soft and sweet. Continue boiling for 25 minutes for quart sized jars. If you’re at high altitudes like we are add 2 minutes for every additional 1,000 feet of altitude. I boiled ours for 33 minutes.

9. Carefully remove each jar and let cool for at least an hour until the jars reach room temperature. Once cooled, push down on the lid. If it pops back at you then it didn’t seal properly and you should refrigerate and eat those peaches. You can always try to re-process them but I just eat them if it doesn’t seal. If it doesn’t pop back at you then it has sealed correctly. You should go ahead and stand each jar on its lid to make sure no leaking occurs. Again if leaking occurs, eat them. If no leaking occurs they have been properly sealed and are safe for storing!

upside down peaches

10. Canned peaches will last up to 12 months; be sure to label and date each jar. Upon opening if there’s any mold or any other unidentifiable substance on the peaches, toss them.

I’ve done 4 jars already and plan to do another 8 between tonight and tomorrow. Working in such a tiny kitchen makes it challenging to do large loads at one time. I also plan to make peach jam and will share that with you guys as well. Feel free to ask me any questions. I’m no expert but I’m getting better with each time I process!

product review: sally hansen manicure gel kit

I’ve mentioned before that my Mom is a nail tech. So really for about the last seven years I’ve only paid to have my nails done if it was a girl’s night out or wedding party thing or something like that. And now, while I would have to say I’m less girly that a lot of people, I do still like my nails to look nice. Probably because my Mom’s a nail tech…

When we moved to Denver I was thinking that it’s going to get real expensive to be getting my nails done often. And since I’m one of the cheapest people on earth that wasn’t going to work. So I’ve actually been painting them myself and trying really hard to get better at it.

sally hansen

But when the nice people at Sally Hansen sent me their new gel manicure set to try out I was all for it. I LOVE gel manicures but they’re expensive (unless you have a Mom like mine. Thanks Mom!). So I was psyched to try this out. And I have to say, coming from someone who is so bad at painting nails; I did a really good job, because it was so easy to use.

supplies

The kit includes all the things you need: base, color and top coat polishes, file, buffer, cuticle pusher (technical term there), heat lamp, remover and nail pads. The instructions were incredibly easy to follow. I’ve tried it out twice now and both times I was really impressed.

instructions

There’s something about the gel polishes brushes that make them so much more manageable than regular polish brushes. The bristles are a little shorter so you don’t get the darn polish all over the place from rowdy bristles. I did have to place my nails in the lamp a few times more than it says, but I’m pretty sure it was because I was putting the polish on too thick. It wasn’t an issue, I just would push the button twice.

nails

I’m a fan for sure. I can’t wait to grab a few other gel colors. For around $30 for the kit, it’s well worth the investment if you like gel manicures. That’s how much it is for one at a salon, so if you’re looking to pinch a few pennies this is the option for you. If you decide to try it out I’d love to hear your experience!

Fine print: Sally Hansen provided this kit to me to review, however all opinions are my own and you know that I’m brutally honest. I genuinely think this is a great product for the price and I have already recommended it to many friends!

quick coffee table makeover

We had started with the green and gold coffee table back when we first moved in. And while it was great and a decent size I had a hard time with everything being so rectangular in our living room. The couch is a sleek rectangle, the coffee table was, the desk is, the TV stand is, the dining table is. I was feeling like we needed some other non-square like items in the vicinity.

And as much as I loved the emerald-green and gold I was just feeling like that much of an intense color just  wasn’t me. So after some thoughts and discussions we decided to try out something new. We sold it on Craigslist and perused for something different. I had seen a few styles like these and immediately though no way, too 80s. Until I envisioned it with new paint.

table before

It was listed for $30, the glass was in perfect shape (which is rare for such a dated piece), it was round and it had three tiers. I offered $20, they accepted and it came home with me.

It took me no time to clean it up real good. I used Rustoleums primer and paint in one in oil rubbed bronze and gave it the loveliest makeover.

table finished

But obviously you know the story doesn’t end there. It never does for me. Al was golfing with his friends on a nice Saturday morning. I packed up the car and headed to the local park to paint the coffee table and one other project. We’ve never had a problem before and we are always sure to bring large tarps and paint where there are no people around. I drove the park for ten minutes to find a spot where there was absolutely no one around me.

final

I got kicked out. Yes that’s right. I got kicked out of the park. Some ranger hunted me down and told me painting in the park is not allowed. There was not one other person in sight except for him and I. So, yes a little bit of my Boston attitude came out, but then I packed up my things and went on my way.

My friend Abby told me I could go paint in their yard so I did. But then I ran out of paint. So when I got home Al and I finished the final coat on the table on the small piece of grass outside of our building. I should have just done that from the start.

table circles

In the end this table looks completely different to me. It’s amazing what a change of paint or finish can do for a piece. We love the three tiers and I really love the roundness of it. Next up, a cute area rug to pull the space together so it doesn’t seem so huge and wide open!

one happy island…

So last week we went to Aruba. And it was the most amazingly awesome vacation we’ve ever taken. We took the red-eye out of Denver to Boston where we met my sister and brother-in-law. It took everything in me not to attack them when we met at the gate. I haven’t seen them since April, Al since December.

From there we boarded our flight where us and them both had an open seat in our exit rows. So we had LOADS of space to spread out between the extra leg room and the open seat. It was awesome and a great way to kick off vacation.

The next day friends flew in and met us at the resort. For the next six glorious days we disconnected and our days went like this: beach, lazy river, dinner, casino. With a lot of drinks and food in between. It was amazing and I wouldn’t have traded that time with all those guys for anything. I wanted to share some photos to make you guys totally jealous, if you’d like to see.

Enjoy!

beach

Sometimes we’re major dorks. More like all the time…

PicMonkey Collage11

Peaceful times…

PicMonkey Collage6PicMonkey Collage4

PicMonkey Collage5

PicMonkey Collage3

Sometimes things got a little wild…

PicMonkey Collage

PicMonkey Collage7

Most of all, it was just plain awesome…

PicMonkey Collage1PicMonkey Collage10PicMonkey Collage8

chickpea chocolate chip cookies

Since I’ve been gluten-free now for about five months I’m learning to be more creative and accepting of weird foods. My food options are so limited that I’ll take a chance at whatever I actually can eat. The hardest thing since being GF is that I can’t just bake something up for a sweet treat. There has to be thought, and planning, and grocery trips. It’s exhausting. When I saw this recipe on Be Better to Yourself I knew I had to give it a shot.

ingredients

Chickpea Chocolate Chip Cookies

1 1/2 cup chickpeas, drained, rinsed and patted dry
1/4 cup maple syrup (honey or agave syrup would do too) — I used honey
2 teaspoons vanilla extract
1 teaspoon baking powder
1/2 cup of organic peanut butter
1/4 cup of chocolate chips — I used dark chocolate chips

blender

Mix all ingredients in a blender except for the chocolate chips. Blend until smooth. Stir in the chips.  Place onto cookie sheet lined with parchment paper.  Preheat oven to 350 degrees. Cook for 15 minutes.

chickpea cookies

These are gluten-free, oil free, soy free, sugar-free and delicious. They don’t bake up into perfect rounds, but oh well. I was so skeptical but they were actually really good. Al loved them too, which, he’s always my food tester because my standards of “delicious” food are pretty low. I mean when you can barely eat foods you bar drops. So if he gives the thumbs up then it’s always a go. Enjoy!